http://www.dcgpac.com/


Wednesday 31 December 2014

How to Tape Cardboard Boxes Correctly

Tape Cardboard Boxes

Did you ever wonder if there was a correct way of taping those cardboard boxes? Simply filling your stuff, closing the lip and putting that long piece of duct tape will never help you to secure the contents properly. Yes, there is a “correct way” of sealing the boxes.

Start with the Right Materials

Even if you manage to tape the materials properly, it won’t do you much good unless you have the right set of materials with you. Start with a sturdy and strong cardboard box. Make sure there are no visible damages or loose edges as this could affect the strength of the box. 

Taping the Bottom

The bottom section is the one that takes the maximum load, so this is the area that you need to start working on first. Close the flaps (if they are open) and bring them all together. Use a nice and thick tape to completely seal the centre portion such that the two big flaps are held together properly. 

The next step is to make a cross with the tape. You might have heard this suggestion a lot of times. But this does work. Make sure you seal off the bottom end of the box before you make the cross. This helps to keep the base even more stable.

The final step in this stage is to make two parallel tape lines on top of the original taped line but in the other direction. This will help to keep the base and the structure pretty strong. 

Securing the Top

The trick to getting a properly packed and tight surface is to fill the contents properly without leaving gap or any space. Just place everything tightly and place it carefully. This way, nothing would move or shift while the box is transported. Once you close the flaps, push it slightly to ensure that it gets a nice and tight seal. 

Like we did in the bottom section, you need to tape off the center section with a thick tape. Now that the section has been taped, add two parallel tape lines on top of the center line but make sure you make these in the other direction. This should give it a nice and tight seal.

Some Friendly Advice

Use a tape dispenser to save time. Don’t rely on yourself for holding the box, measuring the length of the tape, handling the sticky portion of the tape, and applying the tape. This can be done individually. However, it would require a lot of effort and multitasking abilities to pull it off. So make sure you use a dispenser. 

You can use tapes that have text written on this. This is really helpful while marking the boxes. If you use these tapes, then place one on the side, and one can be placed on the top. This would give the necessary information to the handler. 

Tuesday 30 December 2014

Corporate Gift Packaging Ideas for the New Year

Corporate Gift Packaging Ideas

Corporate gifts are provided by organizations to their employees and usually have a theme that is evident on all the gifts. But that does not mean it has to be bland and boring. You can always spice it up with unique gift packaging that would simply steal their hearts away. Usually the gifts come with the logo of the company but this is not a mandatory requirement. It is all about making the employees feel special. 

However, people still consider corporate gifts to be pen sets, clocks, watches, etc. This was much desired in yesteryears. But today, organizations have moved towards a trend of giving unique gifts. Even if you have not planned any such thing, you can at least make the packaging interesting enough for your employees. If you are at a wall with corporate gift packaging ideas, here are some fresh directions that could help you move ahead. 

Goodie Basket


There is something special about gift hampers that really makes the day for anyone who receives it. This is a good way to package your corporate gifts as the design makes the contents appear more than the actual number. 

Goodie Basket


The Envelope


Mail anyone? People in the corporate sector are used to receiving posts (even in this age of digital communication). How about titillating their experience with the postal envelope by wrapping their gifts in one. It would bring a smile on their faces for sure. 

The Envelope


Looking Formal Indeed


Corporate is all about being presentable at all times. Then why should you exclude gifts from this rule. This new year, try wrapping your corporate gifts in a simple cover and add an accessory like a tie, ID card or anything else that clicks in your mind. Trust me, this will be more memorable than the contents of the gift. 

Looking Formal Indeed

Tin Can Packaging


This is as simple and rustic as it gets. Just put the contents in the can and wrap it in embroidered fabrics or even colourful wrapping paper. It looks so adorable that anyone would want to get this as a gift. The best part about this package is that the tin itself can be used later as a pen stand, chocolate container or just about anything that the person wants. 

Tin Can Packaging

Bouquet of Gifts

Now this is a bit elaborate but will definitely leave a lasting impression on the receiver. Just think about it. A gift package that is topped by this beautiful arrangement comprising flowers and chocolates. Ladies watch out! This could make you fall in love again.

Bouquet of Gifts


Monday 29 December 2014

How to Tie the Perfect Bow on Your Gift Package!

Gift Package


(Pic Courtesy: Lia Griffith [link to https://www.youtube.com/watch?v=2qSvnCux5QM])

I know that you made several attempts at making that perfect bow while wrapping your gift. It isn’t as daunting as it appears. In fact, it can be as easy as tying your shoelace. Remember, the first time someone taught you to tie your shoelace. Well, this is pretty much the same thing. You only need to take care about the length of each loop of the bow. It should be equal as that is what defines a “perfect bow”.

Tie a Simple Knot

Tie a Simple Knot

Start by taking your ribbon and trying a simple knot. This should not be difficult. Just make sure you place the ribbon around the middle to get a good position for the bow. 

Hold the Knot in Place with Your Finger

Hold the Knot in Place with Your Finger


Now that you have made the knot, keep your finger on it so that the knot doesn’t get loose. This is important for the next step which involves making the loops for the bow. 

The First Loop

The First Loop


This is the most important step in the entire process. The first loop needs to be made with utmost care and remember, you only need to create the first loop now. Once you have made the loop, take the other end under the loop. 

The Second Loop

The Second Loop


Now that you have the free end of the ribbon under the first loop, push it through the knot and let it come out the other end. This is your second loop. You really need to be careful while doing this as even a small mistake could require the whole knot to be undone and then made again. 

Adjust the Bow

Adjust the Bow


When you have two loops of equal length, then adjust the bow to make sure everything is in place. Give the loops a slight tug to ensure appropriate tightness in the knot. 

Cut the Ends
Cut the Ends


Those long ends are not giving a nice visual appeal to the overall presentation. So you need to snip them away. The best way to do it is to fold the ribbon and make a diagonal cut just a few centimeters away from the knot. Do this for the other end also. 

Your Perfect Bow is Ready!

Your Perfect Bow is Ready!

Just straighten out the ends, give a slight tug to the loops and the “perfect bow” has just been made. It wasn’t that difficult, was it? If this is your first time, then be patient and don’t worry. So what if it didn’t turn out like this on your first attempt, you only need a few more to get the hang of it. 

So go on and make impressive bows that are nothing short of being perfect. I am sure your friends will be pretty amazed at your craftsmanship. This is just the basic bow. With time, you would be able to come up with complex bow designs that involve much more than just a few knots and loops. 

To order your gift packaging materials, visit DCGPAC Now !!


Thursday 25 December 2014

3 Minute Gift Wrapping Ideas for the Busy Soul

Gift Wrapping Ideas

It’s not that you forgot about wrapping up the gifts. You just don’t have the time for it because you are a busy person. It is also possible that you did indeed forget about the gifts and now you are running out of time. If you mess up the wrapping, then you would fail to make an impression on the people receiving the gifts. Creating a presentable wrapping would take some time, which you are clearly running out of. What’s the best thing that can be done?

Here are some amazing gift wrapping ideas that should not take more than 3 minutes to do and they don’t compromise on visual appeal in any way. 

Bon Bon Style Wrap

Bon Bon Style Wrap


It just doesnt get any simpler than this. Even if you have less than 2 minutes to make this wrap, you would be able to do it easily. Just keep your gift item on a sheet of paper, fold around completely, pinch the ends and hold in place with a tape, and tie ribbons. It should not take more than 3 minutes to create this classic gift wrap design. 

Fabric Pineapple Wrap

Fabric Pineapple Wrap

The trick here is to get a good cloth piece with the right colours. This is the only part that would need your time. Once you have it with you, it’s all a matter of placing the object inside and folding up the ends to form a pinched end. With that done, you need to tie the junction and put a ribbon, flowers, balls, etc. That’s about everything that needs to be done here. My guess is that it took you less than 3 minutes (excluding the cloth searching part). 

Pouches

Pouches


You can find these in your house or office anytime. Even if you do not have them, you can always buy them as they are easily available. This is probably the fastest gift wrapping ideas. It might not exactly be a wrap but at least it makes a good presentation with minimal effort. Just keep the contents inside and tie the end with a simple string. The star of the show is the tag or the label. This is what gains the most attention in this package so make sure you write a nice message or the name of the recipient. 

Simple Box n Ribbon Wrapping

Simple Box n Ribbon Wrapping


This is a simple gift wrap. There isn’t anything bold about this design. But it is appealing and has a rustic simplicity in it. This can take slightly more than 3 minutes to make but it would be definitely worth the while. Just use a wrapping paper and make sure you use a corrugated box. The box will give you fixed dimensions and it would be easier to work with it. A simple wrapping should not take much time. Now for the fancy flower on the ribbon part, you need to tie the ribbon in a cross like you tie any string. Get a readymade flower or fancy ribbon design and simply stick it on the joint. Voila - you have a neat gift in just over 3 minutes. 

Wrapped in Cloth

Wrapped in Cloth


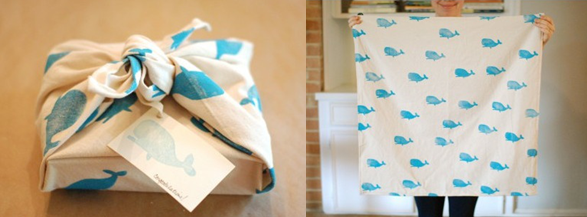
If you think that wrapping your gift in a piece of cloth is weird, then check out the traditional gifting style of the Japanese. They have been wrapping their gifts in clothes since ages and it does make a simple yet rustic gift wrapping design. This would take under a minute for the actual wrapping and around 2 minutes for finding the right piece of cloth. Once you have the right piece of cloth (with a pleasing design of course), you simply need to put the item in it and tie it just like you would a bundle. 

Tuesday 23 December 2014

4 Creative Gift Wrapping Ideas for Christmas

Gift Wrapping Ideas

Have you thought about your own creative packaging for Christmas this year? I know you must be struggling quite a lot with the ideas. It is not that tough if you think about it. Just let your emotions guide you and I am sure that you would be able to come up with your very own unique and creative. Considering that Christmas is due in 2 days and the New Year is just a week away, here are some ideas just to help you get started. 

Christmas Tree Packaging

Christmas Tree Packaging


Yes, this is a centerpiece. But if you take a good look at it, this is an interesting packaging design. This would work well when you intend to give a lot of gifts or you simply want to place the gifts collectively in one place for the kids. The “Christmas tree” like design and the careful placement of the gifts in decreasing order (by size). Now isn’t this a cool way to make the occasion even more special? 

Brown Bag Doodle Wrapping Paper

Brown Bag Doodle Wrapping Paper


Now this is an interesting idea. Brown paper and doodling. This is probably one of the simplest and most rustic packaging ideas ever. The best thing about doodling is that you are not expected to be perfect. You can make not-so-straight lines and curves that are slightly off. This is because at the end of the day, it is the emotions that matter. This is also a time saver as you only need to wrap in brown paper and then make the doodles with a marker. That is pretty much everything that needs to be done. 

Tapeless Wrappers

Tapeless Wrappers


Have you ever thought about using embossed plant foil instead of conventional packaging materials? This particular foil is used for covering plant containers and is similar to aluminium foils in terms of texture. So, it is obvious that you would not need any tape to seal the ends. You only need to roll or fold the edges and give it a little pinch. That would take care of the sealing part. For decoration, you can always add balls and mismatched bells at the top section. 

Wrapped in Cloth

Wrapped in Cloth


This may not be the regular gift wrapping idea as not many are open to the notion of using cloth as a packaging material. But this is indeed a rustic packaging material and reflects the way in which things used to be packed in the old times. Use any piece of cloth and simply tie the ends after placing the gift in the fabric. 

The idea in the image is just for reference. It is obvious that you need to select the print and design in keeping with the occasion. But this is definitely a great idea which not only saves time but is pretty easy to manage without using a lot of stuff. 


Saturday 20 December 2014

5 Amazing Christmas Wine Packaging Ideas

Wine Packaging Boxes

There exists a special bond between Christmas and wine. Gifting wine has become more of a tradition during the holidays. Some use it to kick start a party, while others use it exclusively to wash down the rich food that is prepared during this festive period. Either way, wine does form an important component of the celebrations. 

The wine manufacturers already come up with beautiful designs for the packaging of their products. But they would all be the same for that particular product. If you want to make an impression with you packaging and “presentation” skills, then you need to put on your thinking cap and come up with creative ways to pack the bottle. Don’t just resort to wine boxes as it would be a bit bland, unless you plan on decorating the box and coming out with something new.

Here are some wine packaging ideas that should help you get started if you have not yet come up with an idea of your own. In case you have already thought about a design, then these ideas should give you more directions to consider. 

Santa’s Helpers!

Wine Packaging
This may be a good option for those who simply don’t have enough time for packing the bottles in a grand way. Just use some cotton for the beard, a piece of rubber or rolled up cotton for the nose, and a small coloured hat. It is not too difficult to create. 

This will make anyone’s day as it presents the bottle without much packaging so all you need to do is to “rip off the heads”, open the bottle and start drinking!


Wrapped Up!
Wine Packaging


Now this packaging isn’t very complex to pull off (as you can see in the image). Take any wine bottle, wrap it in covering paper and add a piece of rough cloth (use clean ones, obviously) to make a simple yet appealing presentation. By adding the name of the recipient or a personal message in the tag, you can personalize the gift even more. 

Candy Wrapper Packaging

Wine Packaging
Nothing beats the classic “candy wrapper” packaging. Just take any covering or wrapping material (cloth, paper, film), put the bottle in the centre and start converging it at the top. When you hold the ends of the wrapper together, it will appear like a candy packaging. At this point, tie up the end with a ribbon and viola – you have your very own sensational wine gift which would definitely bring back some memories. 


Corporate Gifting!

Wine PackagingSo you are the corporate guy / gal and you want to make an impression on your boss. Then get yourself an arm from an old shirt, find a tie (or buy one if you can), choose a good wine and then wrap the bottle in the arm by completely sealing the bottom. Then put the tie around the bottle’s neck and make sure the presentation looks good. Just think of it as a representation of yourself. Now ain’t that bottle looking every bit like the corporate entity that its meant to be?

Snug in Socks!

Wine Packaging
Yeah right! Socks. You read that correctly. It is possible to wrap up the bottles in old socks and tie up the end with a ribbon. Now before you get all jittery about the thought of using an old sock, remember, the socks would definitely be clean and ensured to be rid of any smell (unless you really hate the recipient and want to spoil his holiday celebrations). Jokes apart, this is a good way to present the bottle as it would not only look good but it would be easier to grip the bottle while taking it along with you. 

Thursday 18 December 2014

How to Manage Packaging During The Holiday Rush Like a Pro

Happy Holidays

It’s that time of the year when the festive spirits are at an all-time high. The holiday season not only bears witness to joyous celebrations, but also heavy holiday rush. After all, everyone wishes to send gifts to their friends, family and loved ones. The holiday rush may not affect you in a major way, but it does have an impact on the performance of businesses, especially those involved in eCommerce as the orders may comprise any number and type of products. 

The thing about the holiday season is that people expect a visually appealing and highly attractive packaging that manages to keep all of the contents safe. This is the challenging part that needs to be approached with care. Usually, businesses come up with their own packaging boxes or packaging solutions so that the spirit of the festive season is not diluted in any manner. However, the problem lies in the fact that customers may order anything and in any number so the business needs to accommodate the demands without compromising on packaging effectiveness. 

Do you want to know how the professionals manage the holiday rush? Just follow these tips and you should be able to do it like them. 

Calculate Your Packaging Requirements

This is one of the most important aspect of the holiday rush. You need to come up with proper estimates of the upcoming demand for your products during the festive season. A good way to approach this would be to use previous year’s data and analyse that in keeping with the rate of business growth. This should give you a good idea about the demand that you could expect this year. 

Keep a Buffer

Just because you need a certain number of packages doesn’t mean that you have to order only that much. It is advisable to maintain a buffer so that any last minute problems related to packaging may be managed without causing any delay in the entire process. Keeping a buffer is also beneficial for surplus demand where the sales go beyond that of previous years. 

Come Up With Custom Designs Especially for the Holiday Season

The most notable issue faced by businesses during the festive season is the difficulty in striking a balance between visual appeal and overall design of the package (from a safety perspective). Cost also plays a major role here as the investment in acquiring packaging material needs to be kept at optimal levels. This is where the need for coming up with custom designs can help businesses as the materials would be prepared according to the specific parameters and this would ensure better compatibility of the packaging with the contents. 

Offer Bundled Packs

This is the safest bet that you (as a business) can take during the holiday season. By offering pre-designed bundled packs, you have less chance of getting orders with products of varying sizes and dimensions. Moreover, all of the products in the bundle would come pre-packed and carefully placed within the package so that everything remains intact with minimal movement. Now that the safety aspect has been taken care of, it becomes even easier to focus on making the package highly attractive by adding decorative elements and carefully placed accessories. 

Inform Your Packaging Material Supplier Beforehand

Make sure that you inform your packaging material supplier about the estimated demand beforehand. This would help you to avoid last minute delays and would ensure that your requirement is fulfilled properly. By informing the supplier beforehand, you also get the opportunity to consider the supplier’s perspectives. This is a valuable insight as the supplier has a better understanding of the dynamics of the holiday rush and he would be able to provide effective tips on managing this hectic season like a pro.